


Tattoo Stencils Maker Online
Turn your ideas into clean, reusable tattoo stencils. Our tool simplifies outline drawing and ensures sharp lines for professional results—whether you’re an artist or trying DIY designs.
Turn your ideas into clean, reusable tattoo stencils. Our tool simplifies outline drawing and ensures sharp lines for professional results—whether you’re an artist or trying DIY designs.
A tattoo stencil is a template that transfers a design onto skin, guiding the artist during the inking process. It ensures the final tattoo matches the original concept, with accurate proportions and clean lines. Without a stencil, freehand tattooing becomes far more challenging, especially for complex designs or first-time artists.
Stencils act as a blueprint. They help maintain consistency across multiple sessions and prevent mistakes that could ruin the tattoo. For intricate patterns—like mandalas or tribal designs—a precise stencil is essential to keep details aligned.
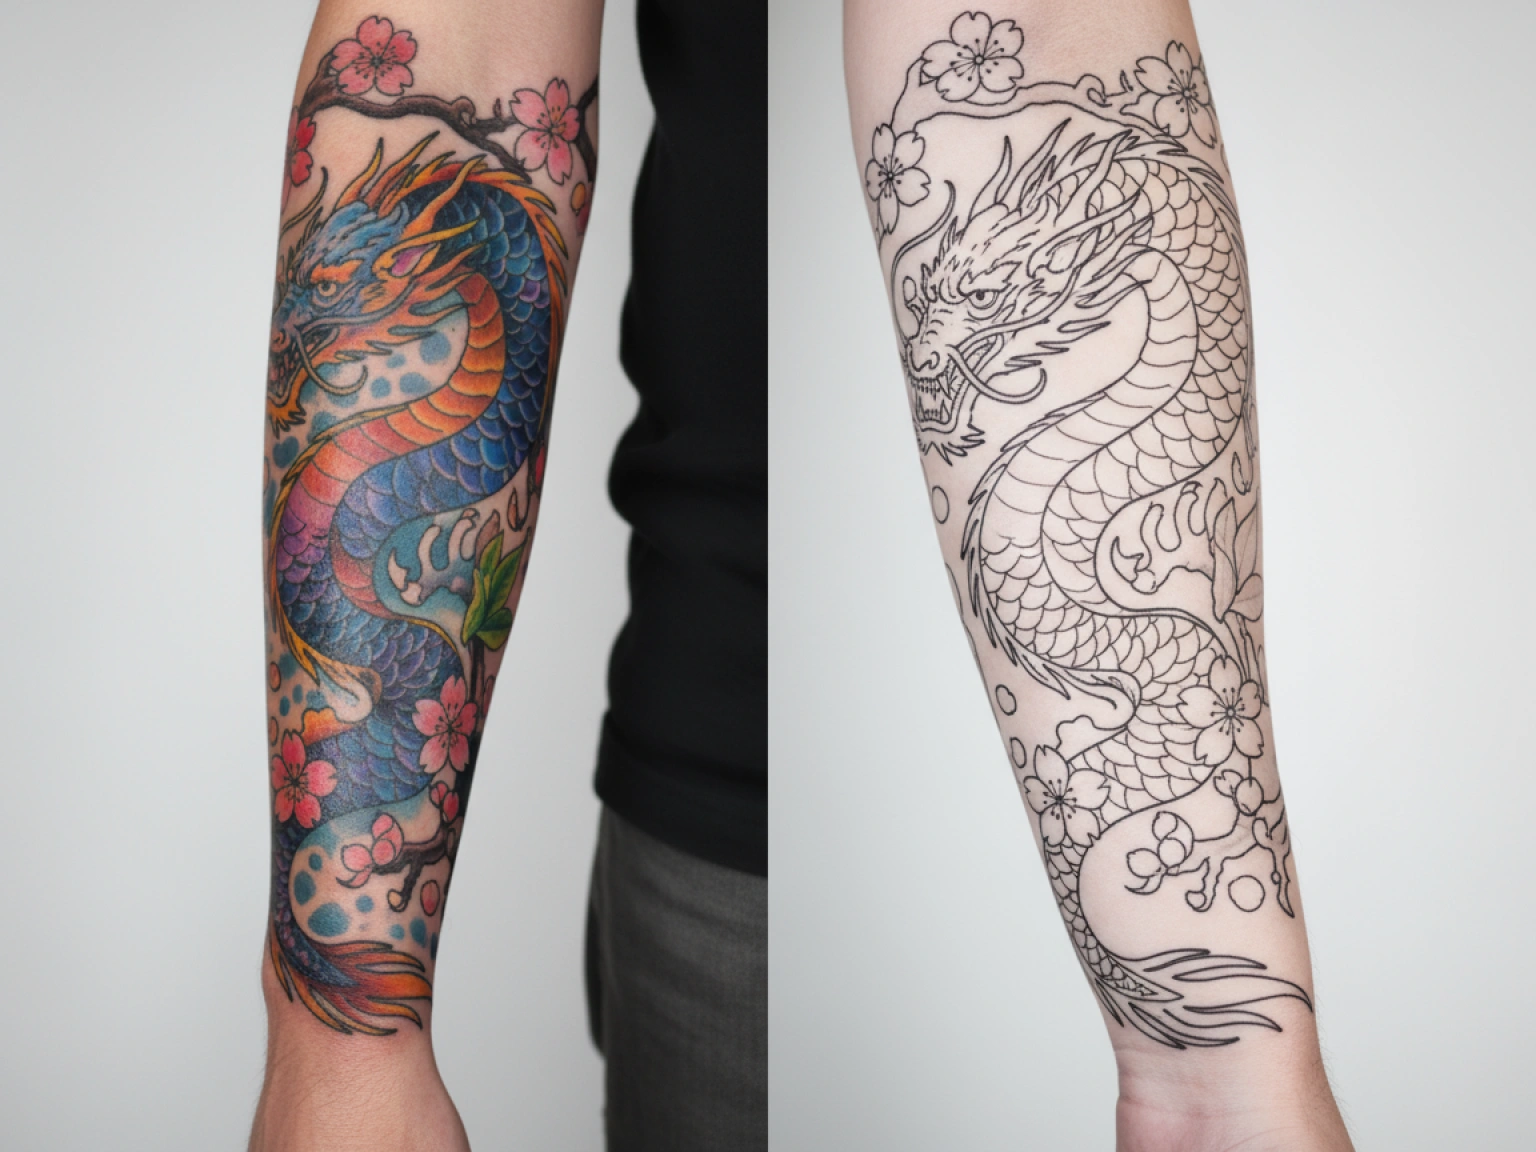
A digital tattoo stencil maker converts artwork into ready-to-print stencil outlines. Unlike traditional methods (tracing paper, hand-drawn outlines), digital tools let you adjust designs digitally before transfer. This saves time and reduces errors.
Dzine’s tattoo stencil maker works by analyzing your uploaded image. It automatically converts colors and shading into a single-layer outline, ideal for stencil printing. You can tweak line thickness, smooth edges, and resize the design—all without altering the original artwork. The result is a crisp, printable stencil that transfers clearly to skin.
A good tattoo stencil must have sharp, consistent lines. Blurred or uneven edges lead to messy tattoos, as the artist can’t follow the guide accurately. The outline should also be simple enough to transfer cleanly but detailed enough to capture the design’s essence.
Durability matters too. Stencils need to withstand skin preparation (like cleaning with alcohol) and remain intact during the tattooing process. Dzine’s stencils, when printed on proper stencil paper, resist smudging and stay in place until the artist finishes the outline.
Precise outline drawing ensures the tattoo matches the client’s vision. A lopsided flower or misaligned lettering in the stencil will translate directly to the skin. Digital tools fix common hand-drawing issues—like uneven curves or inconsistent line weight—by letting you adjust each element individually.
Dzine’s outline drawing feature includes a "Smooth Lines" tool. It automatically corrects shaky or jagged edges, which is helpful for artists who struggle with freehand precision. This ensures the stencil’s outline is both accurate and professional-looking.
After printing, prep the skin by cleaning it with soap and water, then drying thoroughly. Apply a thin layer of stencil transfer gel or deodorant (unscented, alcohol-free) to the area. Press the stencil firmly, smooth side down, and hold for 30 seconds. Peel it off slowly to avoid smudging.
For darker skin tones, use a stencil transfer solution designed for pigmented skin. Dzine’s stencils are optimized for visibility across all skin types, with high-contrast lines that show up clearly during application.
Hand-drawn stencils rely on steady hands and artistic skill. Even experienced artists struggle with consistency—replicating the same design multiple times (for matching tattoos, like couple’s designs) is nearly impossible. Erasers and corrections can leave smudges, which transfer to the skin and distort the final tattoo.
Traditional methods also take longer. A complex design might require hours of tracing and adjusting. For beginners, this process can be discouraging, leading to mistakes that waste time and materials.
Digital tools eliminate human error. Dzine’s tattoo stencil maker ensures every line is uniform, and you can duplicate designs perfectly for multiple uses. The ability to undo mistakes or test different line weights saves time compared to redrawing by hand.
Digital stencils also work with any reference. Upload a photo of a flower, and the tool converts it into a stencil-ready outline—no need to trace manually. This is especially useful for clients who bring in photos instead of professional sketches.
Not all designs work well as stencils.过于 detailed artwork—like a portrait with tiny facial features—can lose clarity when converted to an outline. Simplify where possible: focus on key lines that define the subject, and remove unnecessary shading.
Dzine’s "Simplify Design" feature helps with this. It identifies and retains essential lines while reducing clutter, ensuring the stencil remains clear without losing the design’s character. For example, a landscape tattoo might have its mountain outlines preserved but lose minor rock details.
A stencil that looks good on paper might not fit the body’s curves. A small wrist tattoo needs a more compact design than a back piece. Use Dzine’s "Body Preview" tool to overlay your stencil on a 3D model of different body parts, checking how it wraps around contours.
Scale the stencil accordingly: a 2-inch design works for ankles or fingers, while larger areas (chest, thigh) can accommodate 6-inch or bigger stencils. Always print a test version on regular paper first to check size before using stencil paper.
Blurry lines often come from low-resolution source images. Upload designs with at least 300 DPI to ensure sharp outlines. If your image is low-quality, use Dzine’s AI Image Enhancer to upscale it before converting to a stencil.
Printing errors also cause blur. Use a laser printer (inkjet ink smudges) and set the printer to "high quality." If lines still look fuzzy, adjust the "Sharpness" slider in Dzine’s tool before printing—this strengthens edges for cleaner results.
Poor transfer usually stems from skin preparation or stencil paper quality. Always use tattoo-specific stencil paper (like thermal or hectograph paper) instead of regular printer paper. For stubborn transfers, try applying a second thin layer of transfer gel and pressing the stencil for an extra 10 seconds.
If the stencil still won’t stick, check the skin’s condition. Oily or sweaty skin repels the transfer solution. Clean the area with rubbing alcohol first, then pat dry with a paper towel—this removes oils and helps the stencil adhere.
Pairing a stencil maker with outline drawing apps streamlines the design process. Draw initial concepts in apps like Procreate, then export the file to Dzine to convert into a stencil. This combines the creativity of hand-drawing with the precision of digital tools.
Dzine’s AI Sketch Generator can also help. Upload a photo, and it generates a hand-drawn-style outline—perfect for clients who want a custom sketch but don’t have artistic skills. Use this outline directly in the stencil maker for a cohesive workflow.
To get the best results, invest in these supplies:
Dzine’s stencil maker is compatible with all standard stencil papers and printers, so you don’t need specialized equipment beyond these basics.
Dzine’s tool includes "Design Library"—a collection of pre-made stencil templates (floral, tribal, geometric) that you can customize. This is great for beginners who need inspiration or artists short on time.
The "Mirror Image" function is another standout. It flips the stencil horizontally, which is essential for tattoos that read correctly (like text) when applied to the skin. Many stencil tools skip this step, leading to reversed words.
After creating a stencil, use Dzine’s AI Background Remover to clean up any leftover elements in your original design. If you want to adjust the stencil’s style, try the AI Style Transfer to convert it into a watercolor or sketch outline—useful for clients who want a unique twist.
These integrations mean you can handle every step of the design process in one platform, from initial concept to final stencil.
Q: Can I use a photo of a existing tattoo to create a stencil? A: Yes. Upload the photo to Dzine’s stencil maker, and it will generate an outline based on the tattoo’s existing lines. This is helpful for touch-ups or matching new tattoos to old ones.
Q: Do I need special software to use Dzine’s tattoo stencil maker? A: No. It works in any web browser, on desktop or mobile. No downloads or installations required—just upload your design and start editing.
Q: How thick should stencil lines be? A: Line thickness depends on the design. Fine lines (0.5mm) work for delicate tattoos like minimalist symbols, while bold lines (1-2mm) are better for tribal or traditional styles. Use Dzine’s slider to adjust and preview before printing.
Q: Can I resize a stencil after creating it? A: Yes. Dzine lets you scale the stencil up or down without losing quality. Just ensure the final size matches the body part—resizing too much can make lines look stretched or pixelated.
Q: Is the stencil transfer permanent? A: No. The stencil fades during the tattooing process as ink is applied. It’s designed to guide the artist but won’t remain on the skin afterward.
A clean, accurate stencil is the foundation of a great tattoo. Digital tools like Dzine’s maker ensure lines are sharp and consistent, reducing mistakes during inking.
Compared to hand-drawn stencils, digital makers offer more control. Adjust designs, fix flaws, and duplicate templates effortlessly—ideal for both professionals and beginners.
Proper skin prep and quality supplies (stencil paper, transfer gel) ensure the stencil adheres well and stays in place during tattooing.
Combine Dzine’s stencil maker with outline drawing apps, AI enhancers, and style transfer tools to create unique, customized designs.
Dzine’s tattoo stencil maker simplifies the process, from converting ideas to printing ready-to-use templates. Try it with your next tattoo concept to see the difference in precision and ease.