


Enhance Your Photos with Dzine's Grain Filter Tools
Add texture and vintage charm to images with our grain filter options. Combine with features like eyecolor changer for unique, personalized results—no advanced skills required.
Add texture and vintage charm to images with our grain filter options. Combine with features like eyecolor changer for unique, personalized results—no advanced skills required.
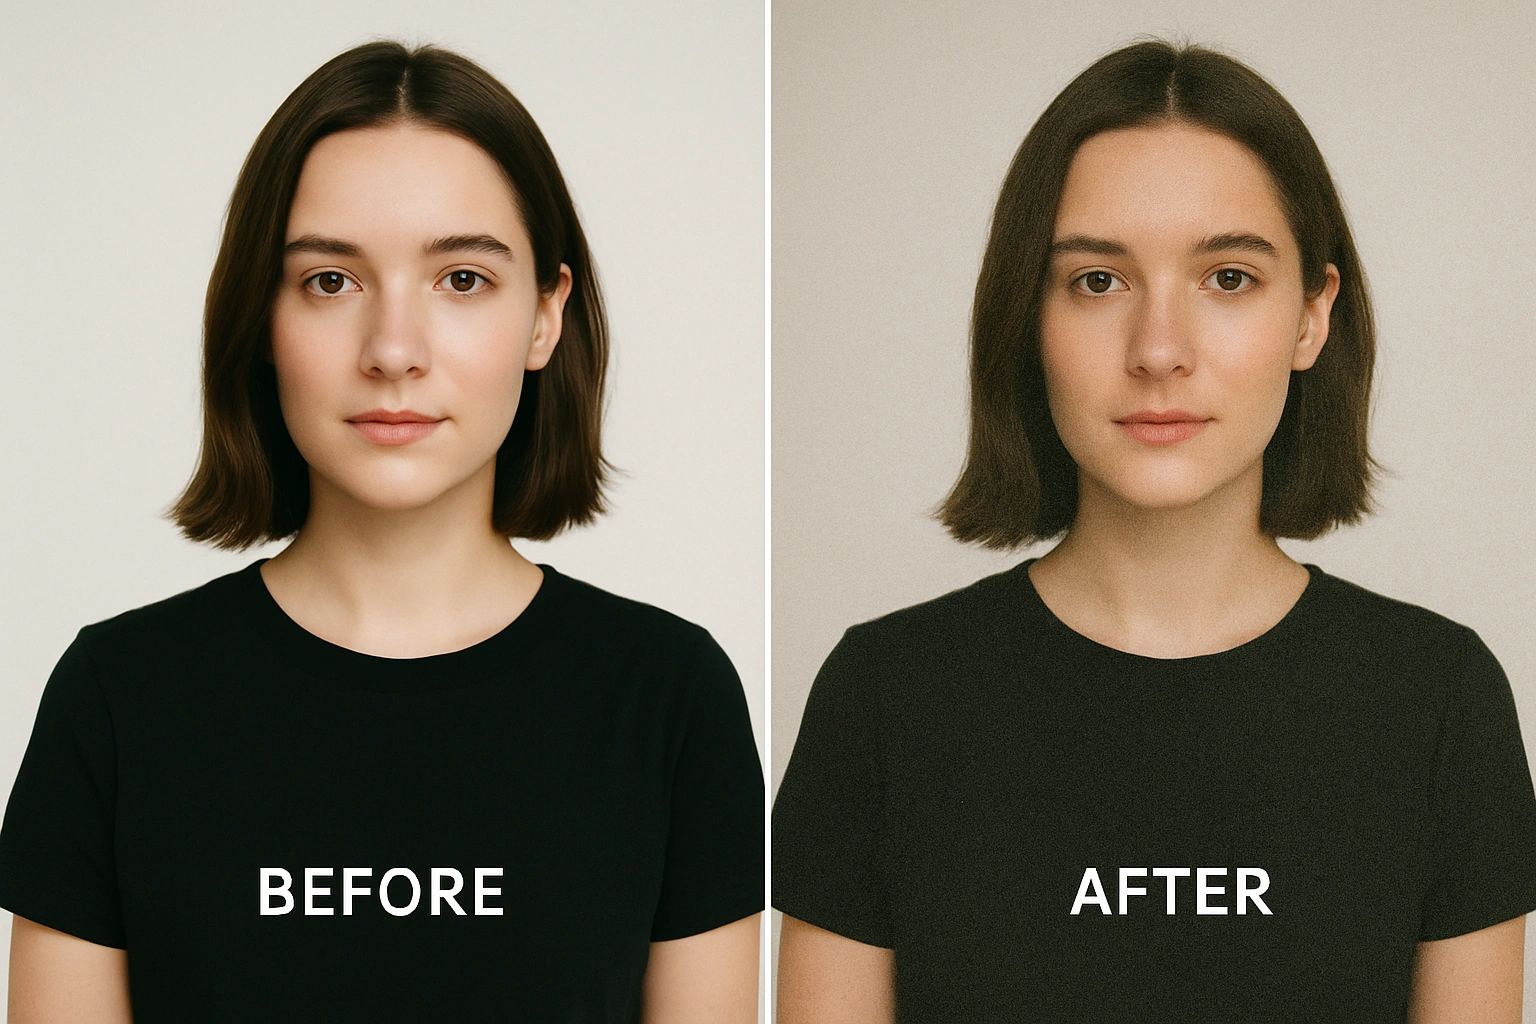
Grain refers to the visible texture in images, similar to the tiny particles in traditional film. A grain filter recreates this effect digitally, adding depth and character to photos. It mimics the organic, uneven patterns that appeared in film photography, where grain size and intensity varied based on film type and exposure.
In digital terms, a grain filter works by overlaying small, random pixels across an image. These pixels vary in color and brightness, creating a textured look. The effect can range from subtle—almost unnoticeable—to bold, making it versatile for different styles and purposes.
Digital grain filters offer more control than traditional film grain. With film, grain was determined by factors like ISO sensitivity and film stock. Digital tools let you adjust grain size, intensity, and distribution precisely.
Dzine’s grain filter, for example, lets you tweak parameters to match specific film types—from the fine grain of ISO 100 film to the coarse texture of high-ISO 3200 stock. This flexibility means you can replicate classic film looks or create entirely new textures tailored to your vision.
A strong grain filter should offer adjustable intensity, size, and distribution. It should integrate smoothly with images without ruining details or creating a artificial, blocky appearance. Compatibility with different image formats (JPG, PNG, RAW) is also important for versatility.
Dzine’s tool includes presets for common styles: "Vintage Film" for a soft, nostalgic look, "High-Contrast Grain" for edgier visuals, and "Subtle Texture" for adding depth without overpowering the image. Each preset can be fine-tuned, giving you both speed and precision.
Aesthetic grain filters focus on enhancing visual appeal rather than just replicating film. They balance texture with image clarity, ensuring the grain complements the subject. For example, a portrait might benefit from a fine, warm-toned grain that adds intimacy without distracting from the face.
Dzine’s aesthetic grain filter analyzes image elements like light and color. It applies grain more densely in shadow areas and lightly in highlights, mimicking how film grain behaves naturally. This attention to detail creates a more cohesive, professional result.
Dzine is designed to be the single platform you need for all your creative photo editing. We combine the power of AI with an intuitive interface to deliver professional results without the steep learning curve, especially when applying complex effects like the film grain filter.
We believe in speed, quality, and accessibility. Dzine offers a powerful alternative to complex desktop software, making the classic film look easier to achieve than ever before.
| Feature | Dzine AI | Traditional Software (e.g., Photoshop) |
|---|---|---|
| Grain Filter Application | Instant, AI-analyzed, realistic texture | Manual noise layer creation, complex blending modes, requires multiple steps |
| Realism & Quality | Intelligent Luminance Mapping for authentic film look | Often uniform noise, requiring advanced manual adjustments for realism |
| Learning Curve | Minimal, intuitive sliders and one-click effects | Steep, requires knowledge of layers, masks, and blending options |
| Accessibility | Online, free to start, works on any device | Desktop software, high cost, requires powerful hardware and installation |
| Integration | Seamlessly integrated with other AI tools (Generative Fill, etc.) | Requires switching between different tools or plugins for a complete workflow |
Photoshop offers grain effects through its "Add Noise" filter, but the process is more technical. Users must navigate through layers, adjust noise type (monochromatic or color), and manually balance intensity. It works well for professionals but can feel cumbersome for beginners.
Dzine simplifies this by automating much of the process. Our tool avoids the need for layer management, making it faster to achieve similar results. For example, adding a film grain filter in Dzine takes seconds, while Photoshop may require multiple steps to avoid color distortion.
Film grain filters excel at recreating the look of old photos. A 1970s-style portrait gains authenticity with a medium grain and warm tones, mimicking the popular Kodak Gold film of the era. Landscape photos from "film cameras" can be replicated with a fine grain that adds texture without obscuring details like foliage or clouds.
Dzine’s film grain filter includes presets named after iconic film stocks. "Kodak Portra" mimics the soft, natural grain of that line, while "Ilford HP5" replicates the higher contrast, coarser grain of black-and-white film. These presets save time when aiming for specific retro aesthetics.
Photos taken in harsh, flat lighting often lack dimension. A subtle grain filter introduces texture that creates the illusion of depth. For example, a product photo with even lighting can feel more tactile with a light grain, making materials like fabric or wood appear more realistic.
Over-edited images—those with excessive smoothing or brightening—can look artificial. A light grain helps restore a natural, organic feel. Dzine’s tool detects over-processed areas and applies grain selectively, focusing on regions that need texture the most.
Social media visuals often benefit from a unique look to stand out. An aesthetic grain filter can give travel photos a dreamy quality, making beach scenes feel more immersive or city streets look like movie stills. Brands use it to align visuals with their identity—e.g., a café might use warm, subtle grain to convey coziness.
Dzine’s users frequently pair the grain filter with our AI Background Remover. Removing a cluttered background and adding grain to the subject creates a polished yet textured look, perfect for Instagram posts or product ads.
Layering effects can produce striking results. For portrait photography, use the eyecolor changer to adjust eye hue, then add a fine grain filter to tie the edit together. The grain softens the artificiality of the eye color change, making the result more natural.
Another combination: apply a bold grain filter to a landscape, then use Dzine’s AI Style Transfer to add a painterly effect. The grain adds texture to the brushstrokes, creating a hybrid of photography and digital art.
Portraits require delicate grain to avoid masking facial features. Use a low-intensity, small-grain setting to add warmth without obscuring details like skin texture or eye lashes. For abstract photos or textures (e.g., a brick wall), higher intensity and larger grain can emphasize patterns.
Dzine’s tool includes a "Subject Detection" feature. It automatically reduces grain around key elements (faces, focal points) while applying it more freely to backgrounds. This ensures the subject remains clear while the texture enhances the overall composition.
Grain behaves differently under various lighting. For photos taken in golden hour (warm, soft light), a warm-toned grain with medium intensity complements the mood. For night photos with cool tones, a finer, cooler grain avoids clashing with the existing color palette.
Use the "Color Sync" option in Dzine’s grain filter. It analyzes the image’s dominant hues and adjusts grain tones to match, ensuring the effect feels integrated rather than added on. This is especially useful for maintaining consistency across a series of photos, like a wedding album or social media carousel.
Excessive grain intensity can make images look noisy rather than textured. This often happens when the grain size is too large for the image resolution—e.g., a 500x500px photo with large grain pixels. Reducing size and intensity usually fixes this.
Another issue is uneven distribution. Grain that clusters in one area (e.g., bright skies) can look unnatural. Dzine’s "Smooth Distribution" tool spreads grain evenly, mimicking the organic pattern of real film.
Grain can obscure important details in busy images, like text or small objects. Use Dzine’s "Detail Protection" slider to reduce grain around high-contrast areas (e.g., text edges, fine lines). This preserves clarity where it matters most.
If grain makes colors look muddy, adjust the "Color Preservation" setting. It limits grain’s impact on color saturation, keeping hues vibrant while adding texture. This is particularly helpful for colorful images like food photography or festival shots.
Dzine’s tool stands out with "Intelligent Grain Mapping." It analyzes image content (e.g., skin, sky, fabric) and applies grain that mimics how real film would react to those surfaces. Skin gets finer grain, while rough textures like concrete get coarser grain.
Our filter also integrates seamlessly with other Dzine tools. After adding grain, you can use the AI Photo Enhancer to sharpen key areas without affecting the texture. This level of integration is rare in standalone grain tools.
Users praise the balance between simplicity and control. Unlike tools that offer only presets, Dzine lets beginners use one-click effects while allowing pros to tweak every parameter. The ability to combine grain with features like eyecolor changer in a single workflow saves time.
Dzine’s grain filter also works in real time. Adjust sliders and see changes instantly, without waiting for rendering. This makes experimentation easy—try different settings, compare, and settle on the perfect look quickly.
Q: Can I use Dzine’s grain filter on mobile devices? A: Yes, Dzine’s tools work on both desktop and mobile browsers. The interface adapts to smaller screens, making it easy to adjust grain settings on the go.
Q: Does adding grain reduce image quality? A: No, Dzine’s grain filter preserves the original image resolution. You can download edited photos in the same quality as the upload, or choose higher resolution options.
Q: How is Dzine’s film grain filter different from generic noise? A: Generic noise is random and often looks artificial. Dzine’s film grain mimics the organic patterns of real film stocks, with variation in size and density that matches traditional photography.
Q: Can I remove grain after applying it? A: Yes, if you save your project in Dzine, you can revisit it later and adjust or remove the grain filter. Downloaded images can also be re-uploaded, and the grain can be reduced using the "Smooth" tool in our AI Image Cleaner.
Q: Is the eyecolor changer compatible with grain filters? A: Absolutely. The eyecolor changer works independently, so you can adjust eye color first, then add grain, or vice versa. The result is a cohesive edit where both effects complement each other.
Whether you want to replicate vintage film or add depth to modern photos, a grain filter enhances visuals in subtle or striking ways.
Our tool offers presets for quick results and detailed controls for customization, making it accessible to all skill levels.
Combine grain filters with eyecolor changer, background remover, or style transfer for unique, professional edits.
Adjust grain intensity and tone based on the image subject, lighting, and desired mood to avoid artificial-looking effects.
Dzine’s grain filter lets you transform ordinary photos into textured, memorable visuals. Try it with your next project to see the difference.